


This no bake chocolate pie is easy to make, rich and so smooth. Perfect for the days you’re craving something chocolaty or don’t want to heat up the kitchen.

Jump to:
Why you need to make this no bake chocolate pie
- Requires no oven
- Super simple to make
- Only needs 7 ingredients
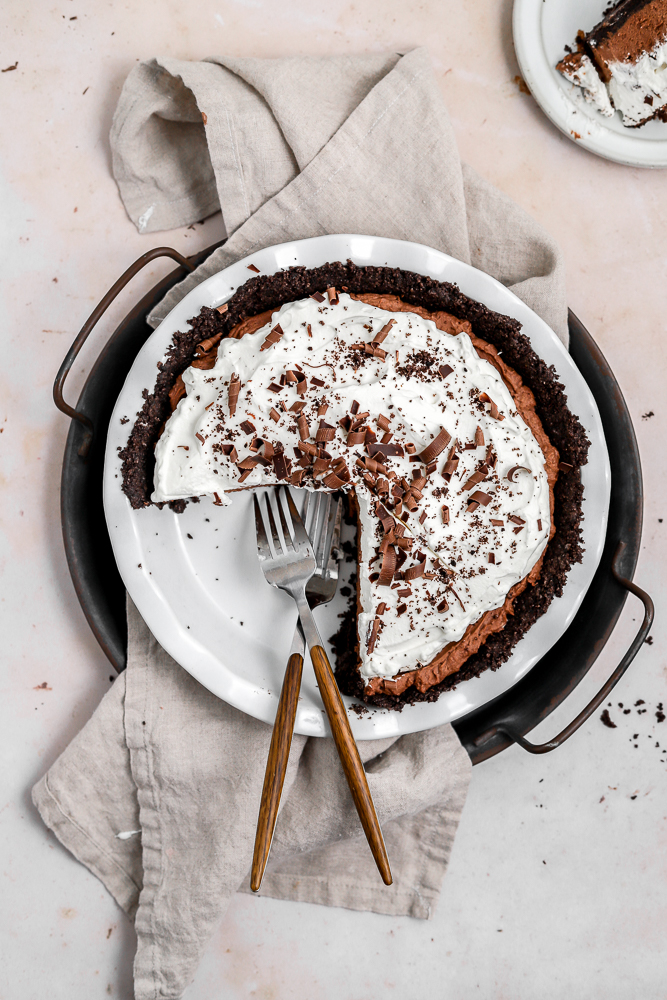
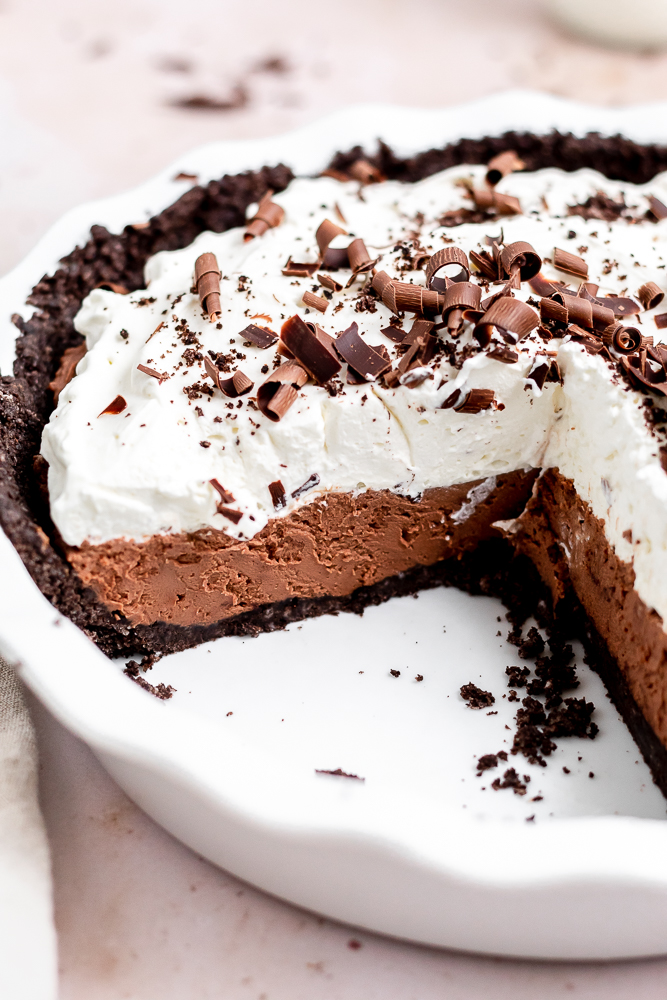
If you’re a huge chocolate lover, you’re gonna love this no bake chocolate pie. It’s all you’re going to want. Rich yet light chocolate filling; a buttery Oreo crust; fluffy sweet whipped cream. And to bring it all together it’s topped with chocolate curls.
Ingredients needed
- Chocolate: Chocolate chips, or chocolate bar cut into chunks. I use semi sweet chocolate. It’s not too bitter or sweet. But feel free to use dark or milk chocolate. Depending on how sweet or bitter you’d like the chocolate filling to be.
- Heavy whipping cream
- Sugar
- Cream cheese: Make sure cream cheese is at room temperature.
- Oreo’s
- Butter

Overview of making the no bake chocolate pie
- Make the Oreo Crust: Combine crushed Oreo’s and melted butter. Press into 9 inch pie dish. Place in refrigerator until ready to use.
- Make the chocolate filling:
- In a small sauce pan over low heat, heat the heavy whipping cream until hot, but not boiling. Add the chocolate and stir until smooth. Take off heat and slightly cool.
- To a mixer bowl, add the heavy whipping cream and sugar. Beat until stiff peaks form. Transfer to a bowl and set aside.
- Beat cream cheese and cooled chocolate in a mixer bowl. Just until combined. About 1 minute.
- Fold in the whipped heavy cream until there are no more streaks of heavy cream.
- Spread the chocolate filling over the Oreo Crust.
- Make the whipping cream topping: In a mixer bowl, beat whipping cream, sugar and vanilla extract until stiff peaks form. Spread whipped cream over chocolate layer. Sprinkle with crushed Oreo and chocolate curls. Refrigerate until set.
Tips for success
- Use good quality chocolate. I have used chocolate chips and chopped chocolate bar. Both worked perfectly. However, be sure to use a good quality brand chocolate like Ghirardelli or Guittard chocolate. This will ensure that the chocolate melts smoothly and lump free.
- If the chocolate mixture is hot, do not add the whipped heavy cream! If you add whipped heavy cream and the chocolate is still hot or even warm, the whipped cream can melt. It’ll create a mess. Instead wait until the chocolate is room temperature but still spreadable and soft, then add the whipped cream. But don’t wait too long as it will firm up the longer it stands.
- This pie tastes best if it sits 15 minutes at room temperature before serving. This allows everything to soften just a bit. However, it still tastes delicious straight out of the refrigerator!
- There are so many options on how to garnish the pie! You can do chocolate curls, as I did below. You can also use more Oreo chunks, any chocolate candy or even nuts.

Other no bake recipes you may like
- No Bake Peanut Butter Chocolate Bars
- No-bake Peanut Butter Chocolate Pie (7 ingredients!)
- No Bake Strawberry Cheesecake Tart
- Raspberry Jell-O Cheesecake
Recipe
No Bake Chocolate Pie

This no bake chocolate pie is easy to make, rich and so smooth. Perfect for the days you’re craving something chocolaty or don’t want to heat up the kitchen.
- Prep Time: 30 minutes
- Total Time: 1 hour
- Yield: 12 slices 1x
- Category: dessert
Ingredients
Scale
The crust
- 3 ⅔ cup crushed Oreo
- 5 tablespoon unsalted butter, melted
No bake pie filling
- 9 oz. chocolate chips or chocolate chunks
- ½ cup + 1 ⅔ cup heavy whipping cream, divided
- 3 tablespoons granulated sugar
- 4 oz. cream cheese, softened
Whipped cream topping
- 1 cup heavy whipping cream
- 1.5 tablespoons granulated sugar
- ½ teaspoon vanilla extract
Instructions
- Combine crushed Oreo’s and melted butter in a bowl. Press into 9 inch pie dish. Refrigerate until ready to use.
- In a small sauce pan, add ½ cup heavy whipping cream. Warm on low heat until hot but not boiling.
- Add the chocolate chips or chopped chocolate. Stir until smooth. Remove from heat. Cool slightly.
- To a mixer bowl, add 1 ⅔ cup heavy whipping cream and granulated sugar. Beat until stiff peaks form. Transfer to a bowl and set aside.
- To the same mixer bowl, add the cooled chocolate and cream cheese. Beat on low speed until just combined. Do not overmix.
- Add the whipped heavy cream. Fold gently using a spatula until no whipping cream streaks left.
- Spoon chocolate filling into chilled Oreo crust.
- To make the topping: Beat heavy whipping cream, sugar and vanilla extract until stiff peaks form. Spoon over chocolate filling.
- Refrigerate for at least 1 hour before serving.
Notes
- Use good quality chocolate. I have used chocolate chips and chopped chocolate bar. Both worked perfectly. However, be sure to use a good quality brand chocolate. This will ensure that the chocolate melts smoothly and lump free.
- If the chocolate mixture is hot, do not add the whipped heavy cream! If you add whipped heavy cream and the chocolate is still hot or even warm, the whipped cream can melt. It’ll create a mess. Instead wait until the chocolate is room temperature but still spreadable and soft to add the whipped cream. It can be just a little bit warm. Don’t wait too long as it will firm up the longer it stands.
- This pie tastes best if it sits 15 minutes at room temperature before serving. This allows everything to soften just a bit. However, it still tastes delicious straight out of the refrigerator!


Sabrina says
This is a beautifully simple recipe which taste good after four hours, but I found the next day it tastes even better! I used simple Nestlé semi sweet chocolate chips, Sam’s Club cream cheese, & I organic heavy cream. I don’t use the cookie crust… I love piecrust, my homemade pie crust with lard, that’s what I used. (Blind baked of course)
I would recommend is making 12 servings instead of 8. It seemed rather rich for my family.
Thank you! Keep up the good work!
nataliyadudley says
Sabrina,
Glad you enjoyed the recipe! It sounds delicious with the pie crust.
Nataliya
Rebekah says
When I mixed the cream cheese with the chocolate I had small clumps 🙁 what have I done wrong? I was afraid of overmixing, please suggest a useful tip when going this step
nataliyadudley says
Hi Rebekah,
So sorry about the small clumps! It could be that the cream cheese wasn’t softened enough. The softer the cream cheese the easier it is to mix. Hope this helps!
Nataliya
Melissa says
What if you don’t have a mixer?
nataliyadudley says
Melissa,
If you have a hand mixer that would work perfectly. Or you can use a whisk to whip up the heavy whipping cream, it will just take lots of effort. The whipping cream shouldn’t be runny. Hope this helps!
Nataliya