


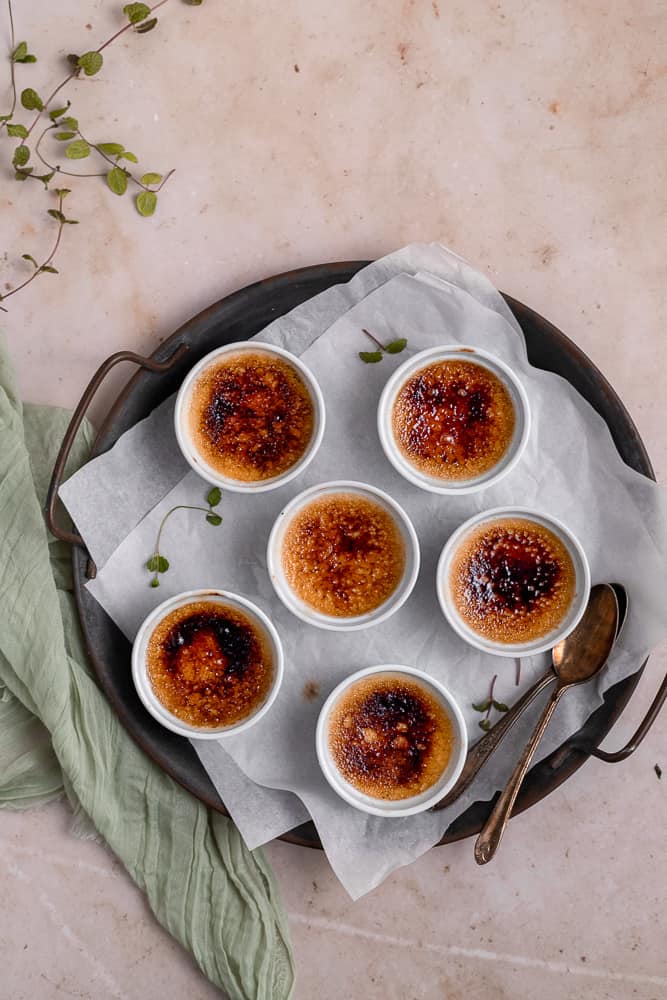
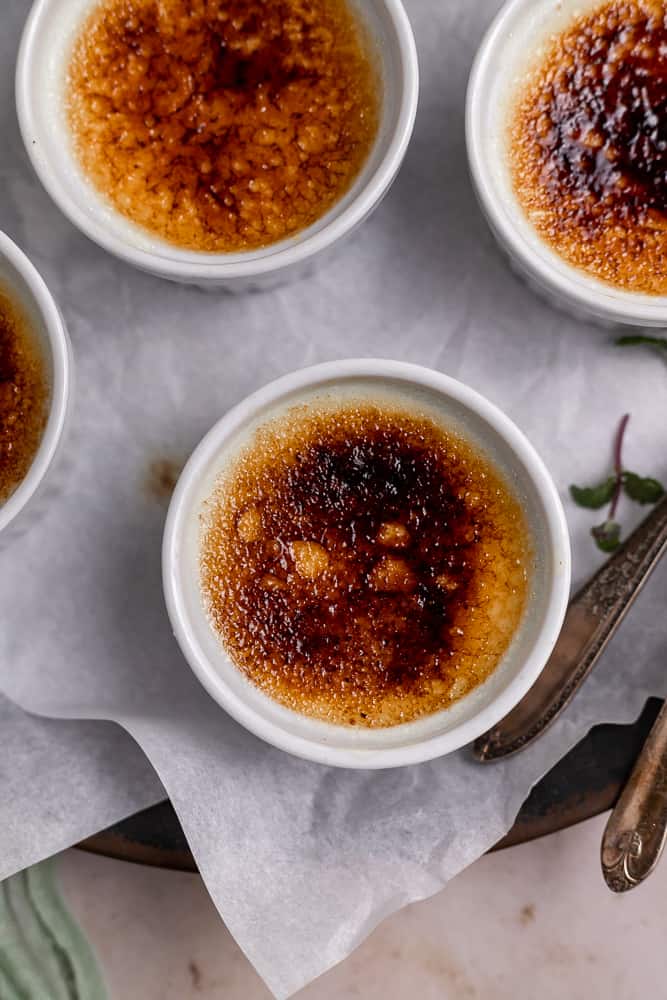
Vanilla bean creme brulee is one of the simplest desserts you will ever make! Creamy custard sprinkled with sugar for an incredible crunch.

This dessert will be yours and your families next favorite. It’s that delicious! The custard is so rich and creamy. The caramelized sugar adds a crunch to the creamy custard. Making the perfect combination!
The simplicity of this vanilla bean creme brulee is what makes it the best. You won’t believe that with a few simple ingredients you can make this incredible dessert! These tiny tips will guarantee you will get that creamy custard every time.
Ingredients needed for vanilla bean creme brulee
- Egg Yolks
- Sugar
- Heavy whipping cream
- Vanilla
Making the creme brulee
- Warm the heavy whipping cream: In a sauce pan, warm the heavy whipping cream and vanilla extract until almost boiling. Then set it aside to cool.
- Combine sugar and egg yolks: In a mixer (on low speed), or a whisk, whisk egg yolks and granulated sugar until just combined.
- Combine the two mixtures: With the mixer on low speed, or use a whisk, slowly add the warm heavy whipping cream into the egg/sugar mixture and mix until just combined.
- Spoon out the foam: The custard will have a little bit of foam formed on top. You’ll want to spoon that foam out. Taking the foam out ensures that the custard is smooth.
- Pour into ramekins: Pour custard into ramekins. Place into large baking pan. Then pour boiling water into pan. Covering the ramekins a little under half way.
- Bake! Bake until almost set. The custard should still be a little bit jiggly; kind of like jello. Let them cool to room temperature. Then refrigerate until firm.
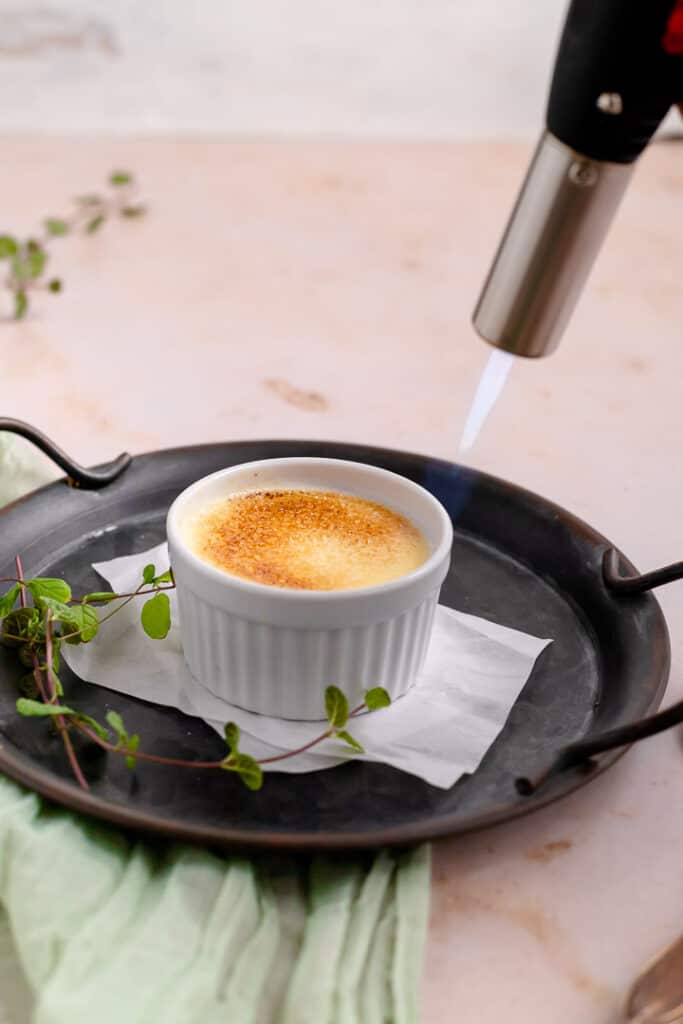
- Add the sugar: Sprinkle sugar on the custard and using a kitchen torch, caramelize the sugar. If you don’t have a kitchen torch, you can use the oven broiler. Just make sure to watch the sugar closely.


Tips
- Do not mix the mixtures vigorously and don’t over mix. You can use a whisk if you’d like for the whole recipe. Or you can use a stand mixer. If using a stand mixer, always mix on low speed. Mix until just combined. If you mix vigorously or on high speed more bubbles will form, resulting in more foam. Which will result in less custard.
- Add the warm heavy cream slowly! Don’t just pour all the heavy cream into the sugar/egg mixture. Pour a little bit, and mix. Then slowly add all of the heavy cream. Doing this will ensure the egg doesn’t cook.
- It’s very important that you spoon out ALL the foam. This ensures that the custard is smooth on top when baked. If there is still foam left on top of the custard, as the custard bakes, the foam will form a bubbly film over the custard.
- If bubbles are formed when you pour the custard into the ramekins, pop the bubbles with a toothpick before baking. This ensures that the creme brulee comes out smooth.
- Don’t over bake! The custard should be a little bit jiggly when you take it out of the oven; kind of like jello. It will firm up as it cools!
- Baking time may vary depending on the ramekins you use. I have used shallow ramekins which only took about 15-20 minutes to bake. Deep ramekins took closer to 25 min to bake.
- If you don’t have a kitchen torch, you can use the oven broiler to caramelize the sugar. Watch the sugar carefully! As it will caramelize really fast.

Store creme brulee in the refrigerator for up to 4 days. Sprinkle and caramelize the sugar just before serving. If you store the creme brulee with the caramelize sugar, the sugar becomes soft and not crunchy.
Creme brulee tastes best after it has stayed in the fridge for at least 3 hours.

Other recipe you may like
- Cream Puffs Filled with Pastry Cream
- Apple Danish
- Triple Berry Layer Cake with Cream Cheese Frosting
ENJOY!
If you made this recipe, I would love to hear from you! Comment, rate and share your photo by tagging tasty_treat_pantry.
PrintRecipe
Vanilla Bean Creme Brulee

Smooth and creamy custard. Topped with caramalized sugar for a delicious crunch! Making the perfect combo. This delicate dessert will become one of your favorites!
- Prep Time: 10 minutes
- Cook Time: 25 minutes
- Total Time: 35 minutes
- Yield: 6 1x
- Category: Dessert
Ingredients
- 6 large egg yolks
- ½ cup granulated sugar
- 500 ml heavy whipping cream
- 1.5 teaspoon vanilla extract, vanilla bean paste or one vanilla bean, scraped.
Instructions
- Preheat oven to 300 F. Boil water to use for the water bath.
- Warm the heavy whipping cream and vanilla extract in a small sauce pan over low heat. Set aside to cool.
- With a whisk, or mixer (on low speed), whisk eggs yolks and granulated sugar until just combined.
- Add little bit of the heavy whipping cream to the egg mixture, and mix. With the mixer on low speed, or with a whisk, slowly start adding the rest of the heavy whipping cream. Whisk until just combined.
- Spoon out the foam that has formed over the custard. Make sure to get all the foam.
- Pour the custard into ramekins. Pop any bubbles that have formed with a toothpick.
- Place ramekins in baking pan. Add the boiled water. Carefully place in oven. Bake for 15- 20 minutes, or 25-30 minutes, depending on the depth of the ramekins. Bake until custard is still a bit jiggly.
- Cool, and refrigerate until firm.
- Before serving, sprinkle with sugar. Caramelize the sugar using a kitchen torch. If you don’t have a torch you can use the oven broiler; be sure to watch the creme brulee closely as the sugar caramelizes quickly.
Notes
- Do not mix the mixtures vigorously and don’t over mix. You can use a whisk if you’d like for the whole recipe. Or you can use a stand mixer. If using a stand mixer, always mix on low speed. Mix until just combined. If you mix vigorously or on high speed more bubbles will form, resulting in more foam. Which will result in less custard.
- Add the warm heavy cream slowly! Don’t just pour all the heavy cream into the sugar/egg mixture. Pour a little bit, and mix. Then slowly add all of the heavy cream. Doin this will ensure the egg doesn’t cook.
- It is very important that you spoon out ALL the foam. This ensures that the custard is smooth on top when baked. If there is still foam left on top of the custard, as the custard bakes, the foam will form a bubbly film over the custard.
- If bubbles are formed when you pour the custard into the ramekins, pop the bubbles with a toothpick before baking. This ensures that the creme brulee comes out smooth.
- Boil the water before pouring it into the pan. Boiling water ensures that the creme brulee is baking evenly.
- Don’t over bake! The custard should be a little bit jiggly when you take it out of the oven; kind of like jello. It will firm up as it cools!
- Baking time may vary depending on the ramekins you use. I have used shallow ramekins which only took about 15-20 minutes to bake. Deep ramekins took closer to 25 min to bake. I would recommend to start with 15 minutes, and go from there.
- If you don’t have a kitchen torch, you can use the oven broiler to caramelize the sugar. Watch the sugar carefully! As it will caramelize really fast.


[…] Creme Brulee […]